One day, a friend of mine was terribly excited and told me he managed to capture blur background photo with his newly purchased DSLR camera and with this, he complimented himself as an outstanding photographer!
That brought back a long lost memory that many years ago when I just started to learn photography, I kept pestering my brother to teach me this blur background technique. When I finally managed to capture it, I felt excited too. Last night, my wife asked me the same question again, so because of her request, I penned this down.
For layman, we called it blur background or more specifically, we call it out-of-focus area but it has a photography term called Bokeh. Bokeh was believed to be originated from Japanese word ‘boke’, which mean ‘blur’ or ‘haze’. Okay, I’m not gonna discuss further about Bokeh because if I do, there is every possibility that I could stretch it to 10 pages long. Right now, we are more interested to know how to create ‘bokeh’.
Before I share with you the technique, we must first understand Depth of Field (DOF) and its relationship to Bokeh. DOF refers to area of an image is in focus whereas the appearance of the light that is seen within the blur part of the photograph is Bokeh. DOF and Bokeh work together to produce a photograph with main subject that stands out from the background without distraction.
To produce these kinds of photos is not a rocket science technology, just follow these camera settings and set up should be able to assist you to produce a relatively decent ‘blur background photo’.
1. Aperture
Open up your aperture, simply mean use the smallest F number available in your lens like F1.8, F2.8, F3.6 etc.
2. Focal Length
Preferably use a telephoto lens with a focal length 85mm and above. If you use a zoom lens, zoom to the longest telephoto end eg. if you are using a 18-200mm lens, used 200mm end instead.
3. Distance to Subject
Physically move in as close as possible to the subject that your lens allow you to be, yet at the same time the lens can still focus properly.
4. Distance of the Subject to Background
Find a background not too close to your subject so that you can isolate them nicely.
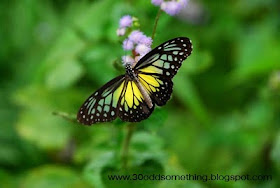
The below photograph of mine is an example where I used my TAMRON AF 18-270mm F3.6-6.3 lens to capture a butterfly during my hiking trip last year in Maxwell Hill, Taiping. I used F6.3 at 270mm end and move as close as possible to subject (in this case is the butterfly) and found some green bushes as background.

Bokeh, boleh!
ReplyDeleteWonderful tips! Very helpful indeed. I am thinking of getting a new DSLR camera and I can't decide what to get between Nikon and Canon... Hoping to try out these tips! :) Thanks!
ReplyDeleteThanks for your comment 'Top Rated Cameras'. I believe Nikon & Canon are equally good but I personally prefer Nikon. Canon launches new model too rapidly, thus you'll find the model you owned becoming obsolete in no time...
ReplyDelete