I am halfway writting my Basic DSLR Photography (Part III): Shooting Mode and out of a sudden, I received a request to talk about bracketing function of DSLR camera. Believe me, I am more than happy to assist in this topic.
What is Bracketing? Bracketing is a technique to take a series of shots of the same scene using different camera setting. Camera setting that can be bracketed includes exposure, ISO, white balance, flash and even focus. Nowadays we always refer bracketing as a camera function; a function that your DSLR camera will fire a series of shots automatically produced images (usually 3, 5, 7 or 9 images) with various settings you desired to bracket.
Bracketing can be done manually too but it is tedious. The whole idea of bracketing is for you to choose the best from the series of shots you have just taken. A long time ago before the digital era, we used film to capture light and took us days to develope the film before you could see the actual photos and result. You will miss a great scene due to mistake, misjudgement or metering in your camera not doing a good job. Bracketing becomes a savior here so that you will have a series of shots with different exposure setting eg. -2EV, -1EV, 0EV, +1EV and +2EV for your selection.
However, today just a blink of eye after clicking your shutter, we can ‘chimping’ the image you have just taken through DSLR camera’s LCD screen to check result and retake if not satisfied. That’s why I can tell you that the bracketing function is not as important as those day in film era.
For NIKON DSLR cameras, Auto Bracketing function is only available for their mid and higher end model such as D90, D300s. It is limited to 3 shots per bracketing for D90 while 9 shots for D300s. You can’t find it in entry level model like D60, D3000 but for the fortunate CANON users, it is available even for their entry level model ie. 1000D. I'm a strong supporter of NIKON but I do hope NIKON will be more generous in their future models.
For some bracketing, you have to do it manually like focus bracketing. Some however, advices to do it automatically like ISO & White Balance but subject to your DSLR camera capability. Some can do it either auto or manual like exposure bracketing. As for me, I hardly use the Auto Bracketing function for exposure but opt for exposure compensation for my shooting and check after each shot through my DSLR camera‘s LCD screen until I am satisfied with it. This is what I call manual bracketing and I find this much easier and simpler as compare to Auto Bracketing function.
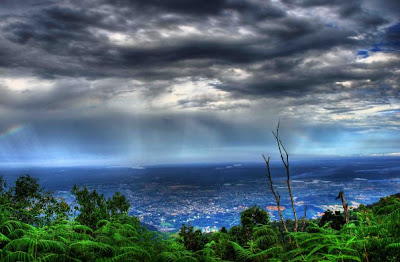
Auto Bracketing comes in handy for me when I want to produce a HDR (High Dynamic Range) image. Today, with photo editing software like Photoshop and Photomatix, you can combine a series of different exposures shots to assemble a single image with huge brightness range. The below image is the result I combined 3 frames with -2EV, 0EV & +2EV exposure bracketing. This post is about bracketing, so I will talk about HDR in my future post or if there is a request.
 I was back in Singapore in end Aug, just a month after attending Jay Chou's concert in July. The concert was totally unplanned but the trip in Aug was well planned with air tickets bought at an incredibly cheap price. I am no longer the young girl I used to be, who had had the energy and vitality to take the MRT trains down to Orchard Road to do window shopping and checked out every single stores with huge signs of SALE on it. For the past 6 years, my itinerary in Singapore was pretty simple : read my novel, play with my nieces, surf the web, do some minor shopping around the HDB neighboourhood and finally, baking for the kids and adults. So this time is like any other time. Armed with Fern's lemon cake recipe, I started baking early Saturday morning. The lemon skin was grated a day before while flour and sugar was weighed before hand. Sensing I need a little help to speed things up, Kakak helped me to wash and clean while I squeezed every drop of lemon juice I could get out from the fruit.
  The lemon juice was poured on top of the cake the moment it was taken out from the oven. I tend to fancy sourish taste and so, I reduced the sugar tremendously. That morning, I baked 1 big square pan and 2 smaller pans as shown above. The big pan was of course, for us to devour while the 2 smaller pans were specially baked for some of my lovely colleagues in Singapore office. I just hope they enjoy it as much as I did.


