Sunday, July 31, 2011

Fried Beancurd with Satay Sauce Dip


I came home from work with a pleasant surprise. Mom had actually made a satay sauce from scratch without the help from the instant packet which most people will conveniently get from the hypermart. Unfortunately, I wasn't at home to witness the entire procedure. Apparently, she made this several times in Singapore and Sydney and it was a hit with everyone. The sauce was meant as a dip for the fried beancurd and freshly cut cucumber. Of course, you may use it as a 'salad' sauce where you drizzle it over smaller cut fried beancurd, shredded turnip, shredded cucumber and shredded carrot. Sounds like a rojak, eh? We all love the sauce, hubby and myself. We couldn't get enough of it and had to glean off the very last drop from the bowl. 


The recipe? Yeah.. the recipe is in her grey matter. I hadn't got a chance to ask her before she left for Singapore. Will get it from her soon.


Friday, July 29, 2011

Red Bean Soup with chunky Sweet Potatoes


There was this miserable packet of organic red bean tucked away in my larder for quite sometime. I still have 3 purple japanese sweet potatoes left in the basket which were shrinking at an incredible speed and so I thought it would be great to cook the red bean together with little chunks of the sweet potatoes. That way, I could get rid of both items at the same time. So I soaked the beans the night before and the following day, I came back home during lunch hour to put the red bean into the slow cooker so that I could have it for dinner. Of course I didn't deliberately come back just for that sole purpose. I just didn't want to have lunch in office, in my pathetic cubicle, facing the computer and having people swinging by my desk and asking me about work related matters or worse, passing the phone calls to me when I'm having my mouth full of food. Hey, it's my lunch hour. I need to get away from office and the only place I can find sanctuary in that 1 hour is my humble abode. Somehow, I had this profound need to rest and 'restore' myself. So off home I went.

The red bean was only ready to be served at half past nine. We had it as a dessert, as part of our dinner. I was only using the following ingredients to cook this lovely sweet dessert  :
  • Organic red bean
  • 6 pieces of pandan leaves
  • 1 big piece of dried tangerine skin
  • 10 dried longans
  • 2 japanese sweet potatoes (because 1 had shrivelled beyond recognition) - cut into some chunks
  • Rock sugar honey
I shared this with a few of my colleagues the following day coz Cousin Soo was too busy to pop over for collection. Not fated this time but I'm sure there'll be another time (soon).

Wednesday, July 27, 2011

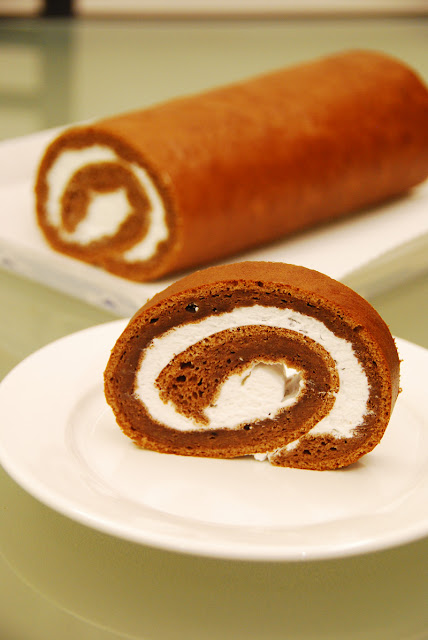
Chocolate Swiss Roll

I was bogged down with so much work in office that I practically worked like a robot this entire week. With the cycling activity which usually lasts till midnight, I barely have enough time to sleep and replenish my energy. At office especially in the morning and right after lunch, I was desperately wishing to take forty winks but of course that was wishful thinking. Well, having grumble so much on insufficient sleep and feeling lethargic, I was surprised at my enthusiasm to rush home to bake a chocolate swiss roll. My brain was telling me to bake but my body was issuing signals to me and telling me to forget about baking. In the end, my brain won. I left office on the dot yesterday and started baking this chocolate swiss roll by using the green tea swiss roll recipe I had. I was short of one egg but I couldn't care less. I substituted the green tea powder with cocoa powder and the results? Unsatisfying. I detest it when things go wrong because that means time and energy wasted. The cake was partially dry and not chocolaty enough. Besides that, I didn't do a good rolling job. Well, it's ok, I'll try it out again next time but before that, I'll need to search for another good recipe.

Cousin Fern wanna have a look at my swiss roll even though I've said it didn't taste good. Since the cake was far from good, I shall refrain from posting the recipe.

Saturday, July 23, 2011

Chocolate Banana Cake

My 1st encounter with Chocolate Banana Cake was at La Manila. That was a decade more ago and during that time, sinking my teeth in this cake was a total indulgence to me. I never thought that a decade later, I would be able to try my hands out on this cake. It was a tedious affair to make this cake as it involved baking the sponge cake, getting the cream ready and making the chocolate ganache. To make things simpler, I used a sponge cake premix to start on. The baking of sponge cake requires 30 - 40 mins, depending on your tin size and oven. When the cake was fully cooled, slice the cake twice to spread the chocolate fresh cream on it. Next, I sent the cake to be chilled in the fridge before pouring the chocolate ganache on top and decorate it with the simplest decorations. I'm proud to say that the cake tasted really really good. Even hubby who doesn't have a sweet tooth, was devouring the cake with 'genuine' interest  (besides the chilled cheesecake). I think I need to try this cake out soon again to perfect it... or rather to ensure that 1st attempt was not just pure luck :) I wished I had more bananas to add into the cream.

Please leave a note if you are interested in the recipe because it's pretty long and I need to type it out :D


Here's the recipe which I got from Madam Ooi.

To Make Chocolate Sponge Cake.
  • Just get a packet of chocolate sponge cake premix. Follow the instructions stated on the packet.
  • Let the cake cool. Slice across 1/3 of the cake and then make another 1/3 slice across it.  This is for spreading of chocolate cream later on.
To Make Chocolate Cream :
Ingredients:
30g     Melted dark chocolate
15ml   Full Cream Milk
150ml Whipped Cream

Method :
  1. Bring the milk to a boil, add in chocolate.
  2. In another bowl, whip the whipping cream until foamy. Beat in medium speed.
  3. Add the melted chocolate and whipped cream together, stir until well combined. Then set aside.

To Make Chocolate Ganache:
Ingredients:
125g   Dark chocolate
125g  Whipping cream
15g     Butter
1 tbsp Honey

Method :
  1. Cook the whipping cream and honey to a boil.
  2. Stir it into the chocolate until the chocolate is melted.
  3. Then add in butter, mix well.
Assembling the cake :
  1. For me, I left the cake in the cake tin with a removable bottom. You have have 3 slices of the sponge cake. Remove 2 slices out and leave 1 slice (bottom layer) on the pan.
  2. Place the sliced bananas on the cake, then take a slab of chocolate cream and gently put on top of the cake (yes, with bananas on top). Please estimate the cream as you will need to leave some for another layer. You do not need to spread the cream evenly. What I did was place a 2nd layer of cake on top of it and press the cake down. This will spread the cream across. Not that evenly but it will do just fine.
  3. Repeat no. 2. Then send the cake to the fridge to chill (for an hour or so)
  4. When the cake is chilled, pour the chocolate ganache on top and let it flow to the side till the entire cake is fully covered with the ganache. Chill the cake again. If  you have extra ganache left, pour a 2nd time on the cake. More chocolate glazing means the cake will be sweeter but this 2nd coat will give the cake a nice rounded coating. Chill the cake and you're ready to dig in anytime.


Thursday, July 21, 2011

Pan Grilled Mackerel in Banana Leaf


Recently I had the chance to get acquainted with Chef Muluk during an event. Over dinner we made small little chat and needless to say, our topic was about food and cooking. When I asked him for little tips to whip up fast meals, he generously shared some valuable tips with me without reservation. One such recipe is to bake or pan grill mackerel (or any fish). Ideally, I would have marinated the fish with a little salt and a packet of instant tomyam paste. Unfortunately, I was forced to discard my one and only tomyam paste simply because it has expired. What a shame. Anyway, all's good coz I got to follow the marinates given by Chef.
It was just :
  • salt,
  • a teeny weeny bit of tumeric powder, 
  • a little chilli powder (my own idea),
  • pieces of sliced tamarind (I had those wet type and so I mixed a little water with it and rub on the fish)
  • slice onions

I didn't marinate it for long before I wrapped it nicely with a big piece of banana leaf and then with the aluminium foil. I removed the foil after I pan grilled for approximately 8 mins because it seems like I was taking forever to get the fish cook. You see, I was running a little late for dinner. Frankly speaking, I prefer my fish to be fried because I love fried stuffs. A little unhealthy but yeah, I still prefer that way. Perhaps the fish would be properly infused with the aroma of banana leaf had I not removed the foil. But then again, hubby and I had a feast of banana leaf rice with pan grilled fish in banana leaf and of course, with 2 other dishes. Hubby was happy that he has 2 less plates to wash. He was more than happy. He was elated.


Sunday, July 17, 2011

Sweet Bun Rolls


 I've never been good with using yeast in my baking. Those previous successful bread baking were done by my ever faithful Kenwood bread machine. Two weeks back, I attempted a sweet potato steam bun with mom and it didnt' turn out well. I was left bitter and defeated. Then yesterday, I tried out this simple Sweet Bun recipe I've browsed through web recently and that was my very 1st time kneading the dough with my 2 bare hands. By the time the kneading was done, my hair was damp with sweat and my right arm felt like it was detaching from my body. It was a good 40 minute of nonstop kneading which saw my hopes rising when the smooth dough was formed but it was dashed in an instant the moment I poked my finger on it. It was then I had this strangest feeling in me that the bread will fail. I was right. It was not as soft as it promised in the recipe but it was definitely edible if you eat it hot on the spot. The next day however, I had to send the buns to the trashcan.

This morning I woke up with a fresh new determination to try out the bun recipe again. Yesterday's horror of manual kneading was still vivid in my mind and I took out my bread machine to do the job for me. The dough proof to the size it should be. If you have done bread before, the instant you look and touch the dough before proofing and after proofing,  you'll know right away whether everything's gonna turn out all right or otherwise. This time, the bread didn't fail me. It was soft all right; the kind that I like.


The recipe was adapted from Angie's recipe which I actually halved the measurement.
If only I have some almonds or nut or sesame, I would've decorated it on top of the bun rolls. Perhaps next time, I'll have some sweet fillings for the buns.

 Ingredients :
150g bread flour
150g cake flour
5g active dry yeast
3g salt
125g milk
1 egg
60g caster sugar
50g butter
(1 egg, beaten, for glazing)

Method:
1.  Mix all dry ingredients in a mixing bowl. Add in milk, egg and butter. Mix into a dough.

2.  Place the dough on a lightly floured work surface. Knead the dough until the gluten is fully developed (see tip below) and the dough is elastic, smooth and non-sticky. You may need to knead for about 25 - 30 mins. . Initially the dough will stick on to the work surface but keep kneading it continuously and it will no longer stick on surface but instead becomes a smooth dough. If you have a bread machine like I do, select the dough recipe to take our your kneading.

3.  Place the dough in the mixing bowl and cover with a damp towel or cling wrap to seal in the moisture. Allow the dough to proof until double in size. This will take about 1 hr. To test whether the dough has been fully proofed, press a finger into the dough and withdraw quickly. It should leave a deep impression and spring back very slowly. For an insufficiently proofed dough, the impression will spring back instantly.

4.  Take out the dough and punch out the gas produced. Let the dough rest for about 15 minutes. Cover with a damp towel or cling wrap.

5.  Divide the dough into 60g portions. Shape and add fillings as desired. Arrange dough in a greased or lined pan. Let the dough proof for the second time for about 30-45mins. Cover with a damp towel or cling wrap.

6.  Brush the top with egg wash.  Add sesame on top or almonds or nuts if desired.

7.  Bake for about 15 minutes in a preheated oven at 190 degC. Remove from pan and cool on wire rack.

 
My cooking tip: : I've read somewhere that to know whether the dough is well kneaded and fully developed, all you need is to take a small piece of the dough and stretch it. If it stretches to a thin long layer without tearing, then you know the dough is well developed.


Wednesday, July 13, 2011

Fried Chicken Wings


We were making Nasi Lemak for dinner the other night and when it comes to nasi lemak, I usually relish the idea of eating it with hot chicken wings. Both hubby and I used to be wing lovers and I'm not kidding about our voracious appetite. We cut back on wings ever since we were told that the most poisonous part of a chicken is the wings. Well, I don't know for sure how true this statement is but I gradually find myself shopping for other chicken parts. Having said that, we can't abstain chicken wings entirely for as long as we live. We'll just have to enjoy this 'forbidden' treat once in a while.  The preparation was fast and easy. The outcome was fabulous. Mom was impressed with my simple marinates.


Wash the wings, drain it thoroughly and marinate/rub the wings with following ingredients :
  • Ginger juice (I grated it )
  • Salt
  • Onion powder
  • Garlic powder
Just before frying it, coat the wings with cornflour.
Ta-daa... done.

Wednesday, July 6, 2011

Cucur Udang (Prawn Fritters)


Since mom arrived,  I've taken a back seat and I'm doing this with utmost willingness. She really has this unwavering passion in cooking, trying out new dishes but deep down, I know she just wanna whip up some great food for us to enjoy. This is her very 1st attempt on cucur udang, a recipe she found in my bilingual recipe book. We bought a lot of prawns during our last trip to Kuala Selangor and she casually asked me whether I'll be interested to eat cucur udang. Though it was her 1st trial, the cucur udang came out marvellous. She was generous with the prawns, onions and chili. It was full of real stuff rather than just flour. To eat this, I had to deliberately ride my bike out to the nearest shop to get a bottle of Thai chili. The recipe is adapted from Agnes Chang. After going through the entire recipe, mom said she feels some modification is needed (aisheeh man!)


Ingredients A:
300g plain flour, sifted with 21/2 tsp baking powder
3 eggs
250ml water (1 cup)

Ingredients B:
3 tbsp dried prawns, soaked and pounded
120g prawn meat, diced
3 red chillies, chopped
3 green chillies, chopped
2 stalks spring onion, chopped
2 big onions, chopped
1 tsp salt or to taste


Method:
  1. Mix A in one direction until a smooth batter is formed.
  2. Add B and mix until well combined. Taste it.
  3. Heat up oil, spoon mixture into hot oil and deep dry with medium heat until golden brown and cooked. Dish and drain.
  4. Serve hot as a snack with Thai Chilli sauce.

Saturday, July 2, 2011

Chocolate Chip Pound Cake

My baking itch came back in less than a week after my previous bake. That simply means it's a tad too soon. It was a good thing that I've taken half a day off from work to accompany dad and mom for a nice japanese lunch. Thereafter, we headed to do some brief grocery shopping. It was there that I saw bars of cooking chocolate stacked nicely on the shelf  and instantly,  it sprang to my mind of a recipe that I've wanted to try couple of months back but never got around to do it. There is still a huge solid bar of imported cooking chocolate tucked somewhere in my fridge which I could jolly well use it for this recipe. The original recipe (Donna Hay magazine) asked for normal round pans but the recipe I found from Patricia's website uses bundt pan. I may have more than 15 types of pans in my larder but none of them are bundt pans though. It would look cute and dainty in mini bundt pans but since I have none, I substituted it with the mould I use to make mango pudding. And yes, it looked cute to me. Mom was suggesting that if I insist to have the 'bundt pan' look, she will help me to drill a hole in the centre of the cake with a fat straw :)  Yeaa..... right....


Ingredients :

Cake:
250g unsalted butter, softened
250g caster sugar (I reduced to 180g)
1 teaspoon vanilla extract
4 eggs
250g all purpose flour, sifted
¼ cup (60ml) milk
¾ cup (116g) chopped dark chocolate

Chocolate glaze:
2 tablespoons cocoa powder, sifted
3 tablespoons sugar
1 tablespoon unsalted butter, room temperature
1 ½ tablespoons milk

Method :
Preheat the oven to 160ÂșC. Lightly grease a 20cm (8in) round cake pan and line the base and sides with non-stick baking paper. ( I substituted with 4 mango mould tin)

Place the butter, sugar and vanilla in the bowl of an electric mixer and beat for 10-12 minutes or until light and creamy. Add the eggs, one at a time, beating well after each addition. Add the flour and beat well to combine. Fold through the milk and chocolate.

Spoon the mixture into the prepared pan and bake for 50-55 minutes or until cooked when tested with a skewer. Allow to cool in the pan, then unmold into a serving plate. (I baked  for 40 - 45 mins)

   
For the glaze: mix all the ingredients in a small saucepan and cook over high medium until it boils and cocoa and sugar are dissolved.

Remove from heat and pour over the cake.


 My cooking tips : If you use any other pans of different size and is unsure of baking time, always set the time at a slightly lower duration. When the time is up, check the cake and decide whether you should increase your baking time. Example: this recipe suggested 50 -55 mins . I set my oven to 30 mins. The cake was not fully cooked and I added an additonal 10 mins baking time.