Pages

Sunday, December 11, 2011

Hokkein Mee


I'm finally done with my vegan pledge. It drag for a good 4 months because of the days I skipped when I went for holidays in Taiwan and Kota Kinabalu. I also skipped vegan when I go cycling with my group of cycling friends. The first thing I went for after completion of the entire 'ordeal' was digging into a juicy fried chicken. The next morning, I bought some pork, fresh noodles, beansprout, mustard greens, beancurd, fishcake etc from the morning market , just before I got into office. I wanted to fry a noodle dish for dinner but I haven't the faintest idea what style of noodles I wanna fried. When I got home, it suddenly hit me that maybe I should just fry Hokkein Mee since the noodles are fresh. It's not often I get to have fresh noodles during weekdays. So hubby came home and had a surprised look on his face. I told him it was while he was sleeping, I was buying groceries in the morning market, thus making this Hokkein Mee dinner possible. He just grinned....then ate the noodles.... then gave me one thumb up :D


Ingredients :
Fish cake
Slice pork (marinate with sesame oil, soy sauce and a little cornflour)
Fresh noodles
Mustard Green
Garlic, chopped

Seasoning:
Dark soy sauce
Sweet soy sauce
Light soy sauce
A little oyster sauce
Chicken powder
Water

Thursday, December 8, 2011

Passionfruit Strawberry Muffin


I need to de-stress and one way  to do it is to start doing something I enjoy : baking. However, there's always a danger to that because if my cake did not turn out well, instead of de-stressing, I'll be blowing my top over the failed attempt. I guess the Gods must be watching me, taking pity of my miserable days in office, thus making my baking attempt successful. I'm not a fan of muffin but I like to bake muffins because it's a melt and mix method. The recipe was picked from one of the books I've recently purchased from BBW. Instead of following diligently on the recipe, I replaced the fruits with passionfruit and strawberry.  I'm posting the original recipe while those in bracket were my modification.


Both cousin Soo and I were too caught up in our work today that neither of us remembered that one of us have to do the delivery/collection. I ended up eating 2 muffins today and gave a few to my colleagues. Oh yea...and so much for packing the muffins in a cute lovely box. I don't care; I need to recycle this box.

Ingredients:
2 cups all purpose flour
1 tbsp baking powder
1/2 tsp baking soda
1/8 tsp salt
1/2 cup superfine sugar
2 large eggs
1 cup plain yoghurt (I used 1 standard cup of Anlene yoghurt with berries flavor)
6 tbsp melted butter
finely grated rind of 1 lemon (I used 2 passionfruits)
finely grated rind of 1 lime (I used a few strawberries, cut smaller size)
finely grated rind of 1 orange ( I omit this)


Method:
  1. Preheat oven to 200C. Grease 12 cup muffin pan or line with 12 muffin paper liners. Sift together the flour, baking powder, baking soda and salt into a large bowl. Stir in the superfine sugar.
  2. Lightly beat the eggs in a larger bowl then beat in the yogurt, melted butter and all the citrus rind. Make a well in the center of the dry ingredients and pour in the beaten liquid ingredients. Stir gently until just combined. Do not overmix.
  3. Spoon the batter into the prepared muffin pan. Bake in the preheated oven for about 20 mins, until well risen, golden brown and firm to the touch.
  4. Let the muffins cool in the pan for 5 mins, then transfer to a wire rack and let cool completely.


    Friday, November 25, 2011

    Twilight Saga : Breaking Dawn Part 1


    It's finally here. The long awaited Breaking Dawn but unfortunately they're breaking it into 2 parts. These people really know how to cash in the money. It has been so long since I finished the book that I could only recall certain details of the storyline. I am waiting with bated breath on how the producer is gonna film the .. uh.. um.. bed scene between the 2 popular good looking stars, making it 'interesting' enough to capture the attention of the audience and yet at the same time, has to take into consideration that this movie will be watched by teens, young teens, very very young teens and kids. I would've dash to the cinema this weekend if only I'm in town. Yes, I am very tempted to take a day off  to watch during the weekday but I guess I gotta remove this insane idea from my head. In the end,  the movie has to wait till next weekend. I have a pretty good hunch that it will stay in cinema for long. Um... I probably will be watching it alone again as with the past Twilight episodes...  No sweat coz I've the whole popcorn and coke drink to myself :)


    Twilight, Robert Pattinson, Kristen Stewart

    Monday, November 21, 2011

    Salad + tropical fruits = dinner


    It's been a long while since we last ate salad. The rain has been wrecking our plans to ride (meaning no calories burn) while our bellies are growing larger with each passing day. So we made a pledge to eat solely fruits and vegetables for dinner for this entire week. The dressing used was mustard grain and I thought it tasted a bit ..... weird. It certainly didnt' taste weird when my neighbour whipped up her fantastic salad with the same dressing, plus some vinegar and crushed garlic. The papaya and rambutans compliment my salad very much by giving a sweet taste to it. Oh.. in case if you're wondering, yea...the 'white flesh' in the remekin is rambutan. I don't eat it straight from the seed but instead, slice the flesh out and eat it with a fork. I thought it's one hell of an enjoyment to eat it this way coz I avoid eating the fine skin that comes off from the seed. 


    Thursday, November 17, 2011

    Spicy Korean Noodles


    I recently purchased this Korean type of metal bowl which has 2 layers of god-knows-what that prevents the bowl from scorching your hands when the bowl is filled with hot soupy food. I was eager to try out and deliberately bought Korean noodles to cook together with puff tofu, shitake mushroom, tomatoes and mustard green. Naturally the small satchet of tastemaker that came with the packet of noodles was not sufficient because I had to add a lot of water to cater for so much ingredients in my noodles. To compensate for the lack of taste, I did what I had to do : added in chili flakes, sweet sauce and a little sprinkle of Maggi Cukup Rasa. Naturally, the Korean spicy noodles didn't exactly came out very 'korean' to me but it did great especially on a cold, windy, rainy night.  And yeah... it was true. The bowl wasn't hot at all on the outer area when I held it. Good buy coz I bought it at 50% off.

    Saturday, November 12, 2011

    Another Vegetarian Pasta toss in olive oil


    I'm seriously running out of food selection. Food that is meatless, to be precise. Here's another quick fix for my vegetarian dinner. It's another pasta tossed in olive oil with my favorite zucchini and swiss brown mushroom. Yea... it's yummy but I really really really wish I have some chewy meat to chew in my mouth. I miss the anchovies. I miss my satay. I miss Nando's chicken. I miss Burger King !!!!!

    Saturday, October 22, 2011

    Vegetarian Fried Noodle


    They were telling me that if you continuously abstain from meat, after a certain period, you'll lose all your cravings for meat. On the contrary, I find my cravings fuelling up with each passing day. For those days that I had to break my vegan out of no choice, I made sure I ate my fill of meat. But each breaking of my vegan fast means I need to replace it back. If nothing unforseen takes place, my vegan day will end on 25 Nov. Gosh!! I can't wait!

    This again is another noodle dish. Umm... yea.. I'm a noodle person. Seriously... I can't remember what sauce I used to fry this noodle. It must be a mixture of chili powder, sweet dark sauce, vegetarian oyster sauce, mushroom powder, a little chilli sauce, some water, soy sauce and dark soy sauce. I know.. I know.. sounds like 'rojak' but believe me,  it's more than edible. It was not that flavorful at first so I thought I might add in a little chili sauce to make it taste slightly like mee goreng. It's nothing to brag about but it's the best I can do with yet another meatless dish. Hubby gave me a tiny thumb up for support :)


    Thursday, October 6, 2011

    Big Bad Wolf is back for the 4th Time !!

    Yo, book lovers out there. The Big Bad Wolf is back and it's even bigger than previous year. I was lucky to have won the preview pass and then 2 days later, even luckier to have won a 5 min shopping spree 'powered' by OCBC. My heartfelt thanks to OCBC for randomly selecting me, to BBW for organizing and making the BBW possible this year (otherwise there won't be such a contest going on) and lastly I thank God for blessing me with abundance luck to have been chosen as one of the 10 winners. The last of the 10 actually.

    As with last year, the books were priced at a crazily low, mind blowing and unbelievable price. Now I know why they have chosen MAEPS to hold the bookfair. The place is huge, filled with books and all sorts of books. My colleague tagged along with me under my preview pass and she was so engrossed with her frenzied shopping till I had to drag her off at 4.30pm. We practically browsed the books for a good 5 hours, with no food and no drink. No wonder I was suffering a massive headache at the end of it.

    See the books in the bag? Well.. I grabbed these in 5 minutes and... they are all free. Yes, FREE.. all of 'em. Yahooo!!


    And here's a better look of my loot. My freebies, whatever you call it.


    It's really worthwhile to make a trip there.  Since Christmas is just round the corner, they'll make fine Christmas presents. Shoo .. go there now before it ends. BBW starts from 7th - 16th Oct.

    Just go the below pix from my colleague who snapped a photo of me with my winnings :D
    Thanks, Chia Ling.


    Tuesday, October 4, 2011

    Mango Mousse Cake

    I've been busy and I've been a wee bit lazy of late too.  It's shocking though to note that my blog somehow came to a complete standstill but I'll try to keep it up and going. Isn't blogging something I professed that I love doing?


    Hubby's laptop finally gave way and we waited for about a fortnight before deciding to get a new one. Then I had to wait for him to program it and when he finally did, to my utmost dismay I found out the photoshop was not in it. Sigh.. so each time when I need to resize/edit my picture, I need to go upstairs to use my deskstop and the internet speed is killing me.

    So much for the excuses for not blogging for weeks :)  I actually baked this cake months ago but never got around to post it.  I love the mousse, love the soft  mushy texture and love mangoes. The only drawback was.... there were no real mangoes in the mousse :D I used the mango purree bought from the baking shop and top it up with some strawberries and real mangoes . I must find time to do it again.

    Saturday, September 3, 2011

    Chicken BBQ Pau & Red Bean Pau (Steam Buns)


    This was done at home, using the same recipe from the class. Smooth filling was not self made.
    As I was saying in my previous post, I took a day off to attend a baking class in Damansara Heights. There were numerous class for me to choose from but in the end, I settled on pau making class instead of pastry pro class. I reckon I will never venture to make a puff pastry since frozen ones are easily accessible. As for sweet pastry, I've done that countless times. I made the right decision because I got to learn how to make pau and the filling from scratch. Yes, from deboning the chicken meat to cooking the red bean filling from the red beans. It was very unfortunate that I couldn't eat the very own chicken BBQ pau I made because I'm still on a vegan marathon. Errr.... I tasted the gravy though coz I know I'll never sleep that night without knowing how the BBQ filling taste like. It sure smell wonderful to my nostrils.


    Wholemeal Chicken BBQ Pau made in the class.
    Okay, I know the pau looked kinda hideous but it was my very 1st time making pleats to the pau instead of just a boring round shape. I gotta perfect this skill and that means more practice. My next pau will be a vegetarian pau. When? Well... soon. Sooner than you thought.

    The wholemeal pau. The one behind was yam pau (flour with yam) with red bean filling

    Yes, unsightly pleated but hey this is just the beginning. It's my 2nd attempt anyway

    As per request from a friend, here's the recipe.

    Ingredients for pau :
    1 tsp instant yeast
    1/2 cup lukewarm water
    1 tbsp sugar
    3/4 plain flour
    3/4 wholemeal flour
    1 tsp cooking oil
    1 tsp double action baking powder (I omitted this entirely)

    Ingredients for filling :
    300g chicken pieces, skinless, boneless, cut cubes, marinated in 1/4 tsp of salt and pepper
    3/4 cup green peas
    1 onion, chopped
    2 cloves garlic, chopped
    1 tbsp cooking oil
    1 tbsp hoisin sauce
    1 tbsp oyster sauce
    1 tsp sesame oil
    1 tsp cornflour

    Method : Pau
    1. Mix instant yeast, sugar and warm water and let it stand for 5 mins.
    2. Mix all the ingredients together and knead the dough for about 15 mins until it forms an elastic ball.
    3. Cover with damp cloth and let it rest for about 30 mins

    Method : Filling
    1. Heat up oil and fry the garlic and onion.
    2. Add in chopped onions, peas and chicken cubes.
    3. Add in the hoisin sauce, oyster sauce and sesame oil.
    4. Mix cornflour with a little water and thicken the filling.
    Method : Wrapping filling in pau
    1. Divide dough to about 8 portions. If you prefer pau to be smaller, divide to 10 or 12 portions. Roll them into balls.
    2. Flatten each dough and make the edges thinner.
    3. Scoop a spoon full of filling into the centre and pleat to seal.
    4. Place pau on a piece of greaseproof paper. Repeat for remaining dough.
    5. Cover the pau with damp cloth and leave it to rest for 45 mins.
    6. Steam over high heat for 15 mins. Serve hot.

    My cooking tips : The double action baking powder serves to proof the dough faster. To ensure dough is well knead for proofing, pull the dough. If it's quite elastic and doesn't break so easily, then dough is well knead.


    My team mates in the class. Starting to make the pau shape.
     
    Kneading the dough for proofing later on.

    Thursday, August 25, 2011

    My One Pot Vegetable Pie


    I bought the 50% off baking voucher a month plus ago and registered for this Pau making class. Instead of posting pictures of the pau I made during the class, I was however eager to show off my easy peasy vegetable pie. What triggered this sudden impulse was all because of the chicken pau I made in the morning class. The chicken filling smell so darn good but I could only taste the gravy all because I'm still on vegetarian (and will be for the next 2 months). It was agonizing enough not to touch meat of any sort (minus the fainting spell) but the pure agony of all was to watch hubby wolfing down the brownish reddish crispy fried chicken the other day at this Melur Discovery. Seriously, at this rate, I'm gonna cracked very soon. I clamped  down on my temptation today and that meant I didn't get to eat the chicken pau I made.


    To compensate, I decided to modify the filling to a vegan filling, subsituting the chicken with all the vegetables that could go with it : shitake mushroom, green peas, carrots, celery and capsicum. Naturally it didn't taste as good without chicken meat but that'll do for the meantime. The filling could go very well with rice or instant noodles but since I have 2 tiny sheets of puff pastry in my fridge, I thought it was time for my remekins to make its appearance. And so I had a vegetarian pie for dinner and nice juicy papaya for dessert. What? Hubby? As long as he is eating at home with me, he has to eat what I cook. Period.

    Filling (chop to small cubes for all vegetables) :
    Shitake mushroom
    Carrot
    Celery
    Green Peas
    Green Capsicum
    Red Capsicum
    Big onions 1
    Garlic 3 cloves
     Hoisin sauce 1tbsp
    Oyster sauce 1tbsp
    Sesame oil 1tsp

    Other Ingredients :
    Puff pastry
    Beaten eggs as egg wash

    Method :
    1. Heat up oil and saute onions and garlic together till fragrant.
    2. Stir in shitake mushroom and saute. Once mushrooms become slightly softer, add in the rest of the vegetables.
    3. Stir in the sauces, with sesame oil coming in last.
    4. Turn off fire and transfer filling into remekins.
    5. Brush a little beaten eggs on sides of the puff pastry and place the side with beaten eggs downward to cover the remekin. Pull it slightly to stick to the edge of remekin to make it taut. Repeat same process with 2nd sheet. You may add another sheet (total 3 sheets of puff pastry) of puff pastry if you like. Brush and top with  puff pastry with beaten eggs and bake in a preheated oven for about 15 mins at 190 - 200C.

    My cooking tips : Subsitute the filling with  chicken by removing mushrooms, capsicum and celery. This filling can be used to make chicken pau.


    Tuesday, August 2, 2011

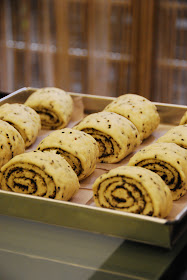
    Black Sesame Mantou (Steamed Buns)

    
    Steaming hot mantou, just out from the wok.
    
    This is my first attempt on mantou. I was suddenly inspired to try it out because of the picture of mantou I saw in my sis in law's (SIL) baking book. I borrowed the book on behalf of my mom because my mom is also into making pau. The book was in chinese and I for one was totally clueless on what was being written on it. I had to ask my SIL to translate the recipe for me. She's a pro in making bread, pau and mantou. Generally anything that uses yeast, she's an expert.


    The mantou has risen again after shaping. It's ready to be steamed.
    I've never been so happier with the way the dough turned out the be. It had double its size in an hour's time. By that time, the dough was so soft, so fragile that it made my heart sang because I smell success. Afterall, it's not often I can get my dough to the right consistency. Hubby is not a fan of mantou or bread but he ate 2 anyway. I ate most of it while sharing some with my in laws and friends. I'm contemplating to replace the thin layer of sesame spread with red bean or lotus paste. Think I should try that out sometime soon?


    The recipe is upstairs and it's in hardcopy. Please leave a comment if recipe is needed.
    Oh yea.. I know the pictures were not well taken because all food pictures were taken by me and I can't handle the DSLR as well as hubby. Been trying to polish my skills on it but... hrmmpp....... guess I lack of the passion.

    Ingredients :
    (A) Water           260g
           Yeast           5g
          Medium Protein Flour (or wheat flour)     350g

    (B) Medium Protein Flour (or wheat flour)      150g
          Sugar                           60g
          Corn oil                        5g (or 1 tsp)
          Black sesame seed       25g
    (C) Black sesame powder  25g
          Icing sugar                   15g


    Method :
    1. Mix (A) with spatula in a bowl. It will be sticky. When well mixed, cover with damp cloth and let it proof for 1 hour.
    2. Mix (B) together. Mixture will be dry. Mix it well. Then take the mixture (A) which has proofed and mix together with mixture (B). Knead it on a floured surface till well blended and dough is smooth and no longer sticky. Leave it to rest for 10 mins.
    3. Take a rolling pin and roll the dough into a large rectangular shape. Brush the top of dough with a little bit of water. Then mix (C) and sprinkle on top of the slightly wet dough. Sprinkle it well and evenly.
    4. Slowly and gentlly roll the dough up (ie like rolling a swiss roll cake). Ensure there is no empty space when you roll the dough. Once done, hold each end of the long dough and slowly pull it to make it even slightly longer. Cut it into 16 portions and place each portion on a small piece of baking paper. Let it rest for another 25 mins. Steam it for about 20 mins.


    My cooking tips : I replace half of the sugar with organic molasses which gives a better taste plus it is healthier. However, the mantou will be slightly brownish reddish due to color of molasses. Corn oil can be replaced with melted butter.


    Sunday, July 31, 2011

    Fried Beancurd with Satay Sauce Dip


    I came home from work with a pleasant surprise. Mom had actually made a satay sauce from scratch without the help from the instant packet which most people will conveniently get from the hypermart. Unfortunately, I wasn't at home to witness the entire procedure. Apparently, she made this several times in Singapore and Sydney and it was a hit with everyone. The sauce was meant as a dip for the fried beancurd and freshly cut cucumber. Of course, you may use it as a 'salad' sauce where you drizzle it over smaller cut fried beancurd, shredded turnip, shredded cucumber and shredded carrot. Sounds like a rojak, eh? We all love the sauce, hubby and myself. We couldn't get enough of it and had to glean off the very last drop from the bowl. 


    The recipe? Yeah.. the recipe is in her grey matter. I hadn't got a chance to ask her before she left for Singapore. Will get it from her soon.


    Friday, July 29, 2011

    Red Bean Soup with chunky Sweet Potatoes


    There was this miserable packet of organic red bean tucked away in my larder for quite sometime. I still have 3 purple japanese sweet potatoes left in the basket which were shrinking at an incredible speed and so I thought it would be great to cook the red bean together with little chunks of the sweet potatoes. That way, I could get rid of both items at the same time. So I soaked the beans the night before and the following day, I came back home during lunch hour to put the red bean into the slow cooker so that I could have it for dinner. Of course I didn't deliberately come back just for that sole purpose. I just didn't want to have lunch in office, in my pathetic cubicle, facing the computer and having people swinging by my desk and asking me about work related matters or worse, passing the phone calls to me when I'm having my mouth full of food. Hey, it's my lunch hour. I need to get away from office and the only place I can find sanctuary in that 1 hour is my humble abode. Somehow, I had this profound need to rest and 'restore' myself. So off home I went.

    The red bean was only ready to be served at half past nine. We had it as a dessert, as part of our dinner. I was only using the following ingredients to cook this lovely sweet dessert  :
    • Organic red bean
    • 6 pieces of pandan leaves
    • 1 big piece of dried tangerine skin
    • 10 dried longans
    • 2 japanese sweet potatoes (because 1 had shrivelled beyond recognition) - cut into some chunks
    • Rock sugar honey
    I shared this with a few of my colleagues the following day coz Cousin Soo was too busy to pop over for collection. Not fated this time but I'm sure there'll be another time (soon).

    Wednesday, July 27, 2011

    Chocolate Swiss Roll

    I was bogged down with so much work in office that I practically worked like a robot this entire week. With the cycling activity which usually lasts till midnight, I barely have enough time to sleep and replenish my energy. At office especially in the morning and right after lunch, I was desperately wishing to take forty winks but of course that was wishful thinking. Well, having grumble so much on insufficient sleep and feeling lethargic, I was surprised at my enthusiasm to rush home to bake a chocolate swiss roll. My brain was telling me to bake but my body was issuing signals to me and telling me to forget about baking. In the end, my brain won. I left office on the dot yesterday and started baking this chocolate swiss roll by using the green tea swiss roll recipe I had. I was short of one egg but I couldn't care less. I substituted the green tea powder with cocoa powder and the results? Unsatisfying. I detest it when things go wrong because that means time and energy wasted. The cake was partially dry and not chocolaty enough. Besides that, I didn't do a good rolling job. Well, it's ok, I'll try it out again next time but before that, I'll need to search for another good recipe.

    Cousin Fern wanna have a look at my swiss roll even though I've said it didn't taste good. Since the cake was far from good, I shall refrain from posting the recipe.

    Saturday, July 23, 2011

    Chocolate Banana Cake

    My 1st encounter with Chocolate Banana Cake was at La Manila. That was a decade more ago and during that time, sinking my teeth in this cake was a total indulgence to me. I never thought that a decade later, I would be able to try my hands out on this cake. It was a tedious affair to make this cake as it involved baking the sponge cake, getting the cream ready and making the chocolate ganache. To make things simpler, I used a sponge cake premix to start on. The baking of sponge cake requires 30 - 40 mins, depending on your tin size and oven. When the cake was fully cooled, slice the cake twice to spread the chocolate fresh cream on it. Next, I sent the cake to be chilled in the fridge before pouring the chocolate ganache on top and decorate it with the simplest decorations. I'm proud to say that the cake tasted really really good. Even hubby who doesn't have a sweet tooth, was devouring the cake with 'genuine' interest  (besides the chilled cheesecake). I think I need to try this cake out soon again to perfect it... or rather to ensure that 1st attempt was not just pure luck :) I wished I had more bananas to add into the cream.

    Please leave a note if you are interested in the recipe because it's pretty long and I need to type it out :D


    Here's the recipe which I got from Madam Ooi.

    To Make Chocolate Sponge Cake.
    • Just get a packet of chocolate sponge cake premix. Follow the instructions stated on the packet.
    • Let the cake cool. Slice across 1/3 of the cake and then make another 1/3 slice across it.  This is for spreading of chocolate cream later on.
    To Make Chocolate Cream :
    Ingredients:
    30g     Melted dark chocolate
    15ml   Full Cream Milk
    150ml Whipped Cream

    Method :
    1. Bring the milk to a boil, add in chocolate.
    2. In another bowl, whip the whipping cream until foamy. Beat in medium speed.
    3. Add the melted chocolate and whipped cream together, stir until well combined. Then set aside.

    To Make Chocolate Ganache:
    Ingredients:
    125g   Dark chocolate
    125g  Whipping cream
    15g     Butter
    1 tbsp Honey

    Method :
    1. Cook the whipping cream and honey to a boil.
    2. Stir it into the chocolate until the chocolate is melted.
    3. Then add in butter, mix well.
    Assembling the cake :
    1. For me, I left the cake in the cake tin with a removable bottom. You have have 3 slices of the sponge cake. Remove 2 slices out and leave 1 slice (bottom layer) on the pan.
    2. Place the sliced bananas on the cake, then take a slab of chocolate cream and gently put on top of the cake (yes, with bananas on top). Please estimate the cream as you will need to leave some for another layer. You do not need to spread the cream evenly. What I did was place a 2nd layer of cake on top of it and press the cake down. This will spread the cream across. Not that evenly but it will do just fine.
    3. Repeat no. 2. Then send the cake to the fridge to chill (for an hour or so)
    4. When the cake is chilled, pour the chocolate ganache on top and let it flow to the side till the entire cake is fully covered with the ganache. Chill the cake again. If  you have extra ganache left, pour a 2nd time on the cake. More chocolate glazing means the cake will be sweeter but this 2nd coat will give the cake a nice rounded coating. Chill the cake and you're ready to dig in anytime.


    Thursday, July 21, 2011

    Pan Grilled Mackerel in Banana Leaf


    Recently I had the chance to get acquainted with Chef Muluk during an event. Over dinner we made small little chat and needless to say, our topic was about food and cooking. When I asked him for little tips to whip up fast meals, he generously shared some valuable tips with me without reservation. One such recipe is to bake or pan grill mackerel (or any fish). Ideally, I would have marinated the fish with a little salt and a packet of instant tomyam paste. Unfortunately, I was forced to discard my one and only tomyam paste simply because it has expired. What a shame. Anyway, all's good coz I got to follow the marinates given by Chef.
    It was just :
    • salt,
    • a teeny weeny bit of tumeric powder, 
    • a little chilli powder (my own idea),
    • pieces of sliced tamarind (I had those wet type and so I mixed a little water with it and rub on the fish)
    • slice onions

    I didn't marinate it for long before I wrapped it nicely with a big piece of banana leaf and then with the aluminium foil. I removed the foil after I pan grilled for approximately 8 mins because it seems like I was taking forever to get the fish cook. You see, I was running a little late for dinner. Frankly speaking, I prefer my fish to be fried because I love fried stuffs. A little unhealthy but yeah, I still prefer that way. Perhaps the fish would be properly infused with the aroma of banana leaf had I not removed the foil. But then again, hubby and I had a feast of banana leaf rice with pan grilled fish in banana leaf and of course, with 2 other dishes. Hubby was happy that he has 2 less plates to wash. He was more than happy. He was elated.


    Sunday, July 17, 2011

    Sweet Bun Rolls


     I've never been good with using yeast in my baking. Those previous successful bread baking were done by my ever faithful Kenwood bread machine. Two weeks back, I attempted a sweet potato steam bun with mom and it didnt' turn out well. I was left bitter and defeated. Then yesterday, I tried out this simple Sweet Bun recipe I've browsed through web recently and that was my very 1st time kneading the dough with my 2 bare hands. By the time the kneading was done, my hair was damp with sweat and my right arm felt like it was detaching from my body. It was a good 40 minute of nonstop kneading which saw my hopes rising when the smooth dough was formed but it was dashed in an instant the moment I poked my finger on it. It was then I had this strangest feeling in me that the bread will fail. I was right. It was not as soft as it promised in the recipe but it was definitely edible if you eat it hot on the spot. The next day however, I had to send the buns to the trashcan.

    This morning I woke up with a fresh new determination to try out the bun recipe again. Yesterday's horror of manual kneading was still vivid in my mind and I took out my bread machine to do the job for me. The dough proof to the size it should be. If you have done bread before, the instant you look and touch the dough before proofing and after proofing,  you'll know right away whether everything's gonna turn out all right or otherwise. This time, the bread didn't fail me. It was soft all right; the kind that I like.


    The recipe was adapted from Angie's recipe which I actually halved the measurement.
    If only I have some almonds or nut or sesame, I would've decorated it on top of the bun rolls. Perhaps next time, I'll have some sweet fillings for the buns.

     Ingredients :
    150g bread flour
    150g cake flour
    5g active dry yeast
    3g salt
    125g milk
    1 egg
    60g caster sugar
    50g butter
    (1 egg, beaten, for glazing)

    Method:
    1.  Mix all dry ingredients in a mixing bowl. Add in milk, egg and butter. Mix into a dough.

    2.  Place the dough on a lightly floured work surface. Knead the dough until the gluten is fully developed (see tip below) and the dough is elastic, smooth and non-sticky. You may need to knead for about 25 - 30 mins. . Initially the dough will stick on to the work surface but keep kneading it continuously and it will no longer stick on surface but instead becomes a smooth dough. If you have a bread machine like I do, select the dough recipe to take our your kneading.

    3.  Place the dough in the mixing bowl and cover with a damp towel or cling wrap to seal in the moisture. Allow the dough to proof until double in size. This will take about 1 hr. To test whether the dough has been fully proofed, press a finger into the dough and withdraw quickly. It should leave a deep impression and spring back very slowly. For an insufficiently proofed dough, the impression will spring back instantly.

    4.  Take out the dough and punch out the gas produced. Let the dough rest for about 15 minutes. Cover with a damp towel or cling wrap.

    5.  Divide the dough into 60g portions. Shape and add fillings as desired. Arrange dough in a greased or lined pan. Let the dough proof for the second time for about 30-45mins. Cover with a damp towel or cling wrap.

    6.  Brush the top with egg wash.  Add sesame on top or almonds or nuts if desired.

    7.  Bake for about 15 minutes in a preheated oven at 190 degC. Remove from pan and cool on wire rack.

     
    My cooking tip: : I've read somewhere that to know whether the dough is well kneaded and fully developed, all you need is to take a small piece of the dough and stretch it. If it stretches to a thin long layer without tearing, then you know the dough is well developed.


    Wednesday, July 13, 2011

    Fried Chicken Wings


    We were making Nasi Lemak for dinner the other night and when it comes to nasi lemak, I usually relish the idea of eating it with hot chicken wings. Both hubby and I used to be wing lovers and I'm not kidding about our voracious appetite. We cut back on wings ever since we were told that the most poisonous part of a chicken is the wings. Well, I don't know for sure how true this statement is but I gradually find myself shopping for other chicken parts. Having said that, we can't abstain chicken wings entirely for as long as we live. We'll just have to enjoy this 'forbidden' treat once in a while.  The preparation was fast and easy. The outcome was fabulous. Mom was impressed with my simple marinates.


    Wash the wings, drain it thoroughly and marinate/rub the wings with following ingredients :
    • Ginger juice (I grated it )
    • Salt
    • Onion powder
    • Garlic powder
    Just before frying it, coat the wings with cornflour.
    Ta-daa... done.

    Wednesday, July 6, 2011

    Cucur Udang (Prawn Fritters)


    Since mom arrived,  I've taken a back seat and I'm doing this with utmost willingness. She really has this unwavering passion in cooking, trying out new dishes but deep down, I know she just wanna whip up some great food for us to enjoy. This is her very 1st attempt on cucur udang, a recipe she found in my bilingual recipe book. We bought a lot of prawns during our last trip to Kuala Selangor and she casually asked me whether I'll be interested to eat cucur udang. Though it was her 1st trial, the cucur udang came out marvellous. She was generous with the prawns, onions and chili. It was full of real stuff rather than just flour. To eat this, I had to deliberately ride my bike out to the nearest shop to get a bottle of Thai chili. The recipe is adapted from Agnes Chang. After going through the entire recipe, mom said she feels some modification is needed (aisheeh man!)


    Ingredients A:
    300g plain flour, sifted with 21/2 tsp baking powder
    3 eggs
    250ml water (1 cup)

    Ingredients B:
    3 tbsp dried prawns, soaked and pounded
    120g prawn meat, diced
    3 red chillies, chopped
    3 green chillies, chopped
    2 stalks spring onion, chopped
    2 big onions, chopped
    1 tsp salt or to taste


    Method:
    1. Mix A in one direction until a smooth batter is formed.
    2. Add B and mix until well combined. Taste it.
    3. Heat up oil, spoon mixture into hot oil and deep dry with medium heat until golden brown and cooked. Dish and drain.
    4. Serve hot as a snack with Thai Chilli sauce.

    Saturday, July 2, 2011

    Chocolate Chip Pound Cake

    My baking itch came back in less than a week after my previous bake. That simply means it's a tad too soon. It was a good thing that I've taken half a day off from work to accompany dad and mom for a nice japanese lunch. Thereafter, we headed to do some brief grocery shopping. It was there that I saw bars of cooking chocolate stacked nicely on the shelf  and instantly,  it sprang to my mind of a recipe that I've wanted to try couple of months back but never got around to do it. There is still a huge solid bar of imported cooking chocolate tucked somewhere in my fridge which I could jolly well use it for this recipe. The original recipe (Donna Hay magazine) asked for normal round pans but the recipe I found from Patricia's website uses bundt pan. I may have more than 15 types of pans in my larder but none of them are bundt pans though. It would look cute and dainty in mini bundt pans but since I have none, I substituted it with the mould I use to make mango pudding. And yes, it looked cute to me. Mom was suggesting that if I insist to have the 'bundt pan' look, she will help me to drill a hole in the centre of the cake with a fat straw :)  Yeaa..... right....


    Ingredients :

    Cake:
    250g unsalted butter, softened
    250g caster sugar (I reduced to 180g)
    1 teaspoon vanilla extract
    4 eggs
    250g all purpose flour, sifted
    ¼ cup (60ml) milk
    ¾ cup (116g) chopped dark chocolate

    Chocolate glaze:
    2 tablespoons cocoa powder, sifted
    3 tablespoons sugar
    1 tablespoon unsalted butter, room temperature
    1 ½ tablespoons milk

    Method :
    Preheat the oven to 160ÂșC. Lightly grease a 20cm (8in) round cake pan and line the base and sides with non-stick baking paper. ( I substituted with 4 mango mould tin)

    Place the butter, sugar and vanilla in the bowl of an electric mixer and beat for 10-12 minutes or until light and creamy. Add the eggs, one at a time, beating well after each addition. Add the flour and beat well to combine. Fold through the milk and chocolate.

    Spoon the mixture into the prepared pan and bake for 50-55 minutes or until cooked when tested with a skewer. Allow to cool in the pan, then unmold into a serving plate. (I baked  for 40 - 45 mins)

       
    For the glaze: mix all the ingredients in a small saucepan and cook over high medium until it boils and cocoa and sugar are dissolved.

    Remove from heat and pour over the cake.


     My cooking tips : If you use any other pans of different size and is unsure of baking time, always set the time at a slightly lower duration. When the time is up, check the cake and decide whether you should increase your baking time. Example: this recipe suggested 50 -55 mins . I set my oven to 30 mins. The cake was not fully cooked and I added an additonal 10 mins baking time.